


Tutorial ~ How To Paint A Black Doll
I am working on my next pattern, a black doll! I thought I would snap some pictures while I was painting her and make it into a tutorial. It is always interesting to me how a doll's personality comes to life one step at a time. She really makes me laugh, I was thinking she may have a different look than she does, but these dolls just end up being who they want to be! This little black girl has the name of Belle, her pattern will be available very soon!


This is Belle sewn, stuffed and ready to be painted. She is made of muslin. Her features were drawn with black pen so they could easily be seen for sewing. Her nose, mouth and eyebrows are stuffed separately so they have dimension on her face.

I first dampen the fabric by brushing on some water, this will help the paint to go on smoothly. I also thin the paint down with water so it will go on more like a wash and not heavy. The goal is to stain the fabric instead of putting on a thick layer of paint.

Put two puddles of paint on a foam plate, one burnt umber and one black. Saturate a sea sponge with water and lightly ring out the excess water.

Pounce your wet sponge in the burnt umber, dip only very small amount of black onto one small corner of your sponge. Pounce these colors so they mesh together. If you don't want your doll as black, just use burnt umber only.

Now with an up and down pouncing motion apply the paint to your dolls face, neck and upper body. I will be leaving the arm area clear because it is easier to apply arms with no paint. As you can see there is mostly brown with jut a hint of black.

Her skin is coming along nicely! I will admit, she is looking a bit scary too!

Your plate helps you to see how the colors are going to come off!

Now that she is painted, I speed the process of drying up by using my heat gun.

Now that she is dry, I am taking a piece of 400 grit sandpaper and sanding Belle's face to give her a worn look. I like to sand more on the nose, eyebrows and mouth to give the face more dimension. I also like to sand above the eyes, below the eyes or wherever the face needs highlights. By sanding above the eyes, it will be easier to define eyelids later.

Her is Belle sanded and ready for painting. First we must place our eyes and then draw the pattern on.

For this doll I cut the eyes out of card stock to use as my template. Find the position you like for your first eye and hold in place with a straight pin. I took a black pen and drew around the first eye.

Here you can see the outline of the eye I drew in. Now I measure with my caliper the width from the inside of the first eye to help place my second eye correctly.

I am also checking to see if the width from the eyebrow to the top of the eye measures the same as the first eye. Once positioned correctly I trace around eye number 2.
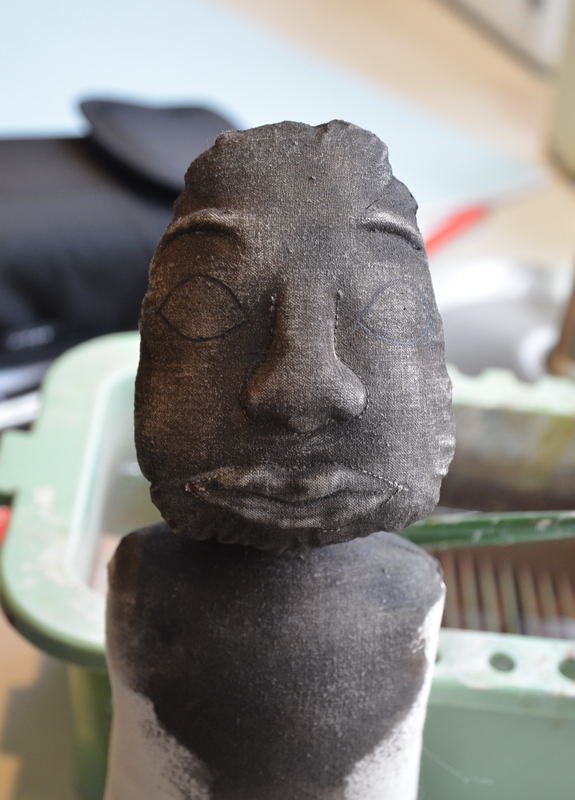
Here you see both eyes drawn in and ready for paint.

I used a warm white to fill in the eyes, bright white would be too much on a dark doll.

I know at this point she is looking a bit strange! Fill in the Iris with a brown such as autumn brown.

Like spokes on a bike tire, use a liner brush and make lines in burnt umber, white and green starting from the inside and out toward the edges. All this fine detail work is done wearing an opti visor, this fits on your head and magnifies your work so you can see it close up!

Here I have loaded a small flat brush in burnt umber and added some shading around the outer edges of the eyes and directly under each eyelid. Adding the shadows under the eyelids is important, it takes that wide eyed stare away and looks more natural.
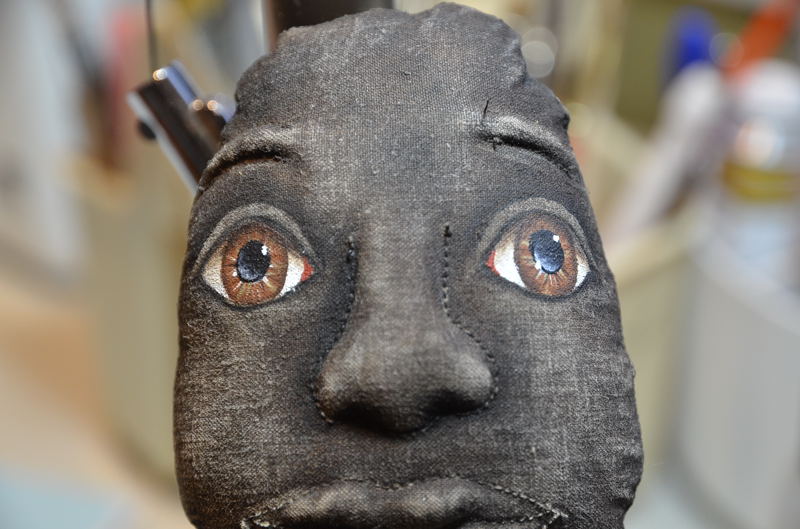
I have added the black pupils, added a float of black (lightly) under the eyelids. I did not think they were dark enough. I also added a float of straight black above the eyes to define eyelids. I painted the inside corners of each eye with red iron oxide. I added a float of black around the nose to make it pop a bit. Anywhere you want to make a feature pop, you can also take a liner brush and line it. I did this with the nose, mouth and eyes. I also added white highlights in each eye.

They do not show up too well on the black, but I did add some eyelashes. I made them more heavy than normal so they would show up.

I have mixed heritage brick and red iron oxide for the blush. I have my medium scruffy brush ready to apply the cheek and mouth color. Dip a dry brush into the paint puddle and swirl most of the paint off onto a paper towel until most of it is gone. You can either apply the color to a dry cheek or put a light sheen of antiquing medium on first to help the color come off softly.

Here is Belle with a little color on her cheeks and lips. Her personality is emerging! I also added two coats of 3D Crystal lacquer to each eye and a single light coat to the lips. This adds some realistic shine!

She is ready for the rest of her body and some hair.


Here she is all finished with all kinds of crazy cork screw hair. Isn't she a funny little thing? :-)
Thank You Jody for another fun and informative Tutorial!
You can find Jody here:


.JPG)


8 comments:
Wonderful tutorial Jody! Your work is just outstanding!!
Kim
Great tutorial!!! I love Jody's work. Such talent!
Thanks for sharing!!!
Lucy
So in LOVE with Kim's work! She is a phenomenal artist! Great Tutorial! Thank you, Kim, for sharing and OFG for posting!
}}Hugs{{
Vicky
Beautiful...I really enjoyed this!!
Hugs,
Judy
Absolutely, beautiful. I really admire Jody's work and thoroughly enjoyed the great tutorial! Thanks a bunch.
Hugs,
Judy
Beautiful...I really enjoyed this!!
Hugs,
Judy
Wow, she's a real work of art. Very helpful toot should I try my hand at doll making one day. Which I just might since I tried it at rug hooking.
Carol
Awesome tutorial! You do such amazing work, your dolls are beautiful! - Laura
Post a Comment