Showing posts with label Sweet Bear Creek Whims. Show all posts

Tuesday, August 27, 2013

Congratulations are in Order!!

The Old Farmhouse Gathering has some pretty exciting news!
This team is so talented!  
We have had three of our members published in these magazines!
Robin of Baggaraggs is featured in Stampington's Holidays and Celebration and also Prims Magazine.
Check out Robin's Blog HERE!
Jody of  Sweet Bear Creek Whims  is featured in Prims Magazine too!
Check out Jody's blog HERE! 
The Santa on the cover is by Ami of Folk Art and Primitives! 
Congratulations Ladies!
Job well done and so deserving!


Tuesday, April 9, 2013

Tuesday Tutorial with Sweet Bear Creek Whims

Tutorial ~ How To Paint A Black Doll

I am working on my next pattern, a black doll! I thought I would snap some pictures while I was painting her and make it into a tutorial. It is always interesting to me how a doll's personality comes to life one step at a time. She really makes me laugh, I was thinking she may have a different look than she does, but these dolls just end up being who they want to be! This little black girl has the name of Belle, her pattern will be available very soon!

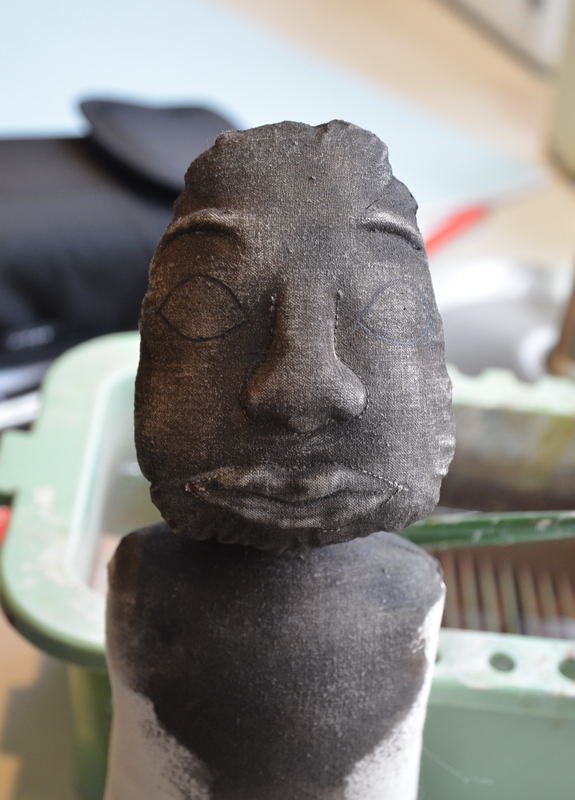
This is Belle sewn, stuffed and ready to be painted. She is made of muslin. Her features were drawn with black pen so they could easily be seen for sewing. Her nose, mouth and eyebrows are stuffed separately so they have dimension on her face. 
I first dampen the fabric by brushing on some water, this will help the paint to go on smoothly. I also thin the paint down with water so it will go on more like a wash and not heavy. The goal is to stain the fabric instead of putting on a thick layer of paint. 
Put two puddles of paint on a foam plate, one burnt umber and one black. Saturate a sea sponge with water and lightly ring out the excess water. 
Pounce your wet sponge in the burnt umber, dip only very small amount of black onto one small corner of your sponge. Pounce these colors so they mesh together. If you don't want your doll as black, just use burnt umber only. 
Now with an up and down pouncing motion apply the paint to your dolls face, neck and upper body. I will be leaving the arm area clear because it is easier to apply arms with no paint. As you can see there is mostly brown with jut a hint of black.
Her skin is coming along nicely! I will admit, she is looking a bit scary too!
Your plate helps you to see how the colors are going to come off!
Now that she is painted, I speed the process of drying up by using my heat gun.
Now that she is dry, I am taking a piece of 400 grit sandpaper and sanding Belle's face to give her a worn look. I like to sand more on the nose, eyebrows and mouth to give the face more dimension. I also like to sand above the eyes, below the eyes or wherever the face needs highlights. By sanding above the eyes, it will be easier to define eyelids later.
Her is Belle sanded and ready for painting. First we must place our eyes and then draw the pattern on.
For this doll I cut the eyes out of card stock to use as my template. Find the position you like for your first eye and hold in place with a straight pin. I took a black pen and drew around the first eye.
Here you can see the outline of the eye I drew in. Now I measure with my caliper the width from the inside of the first eye to help place my second eye correctly. 
I am also checking to see if the width from the eyebrow to the top of the eye measures the same as the first eye. Once positioned correctly I trace around eye number 2.
Here you see both eyes drawn in and ready for paint.
I used a warm white to fill in the eyes, bright white would be too much on a dark doll.
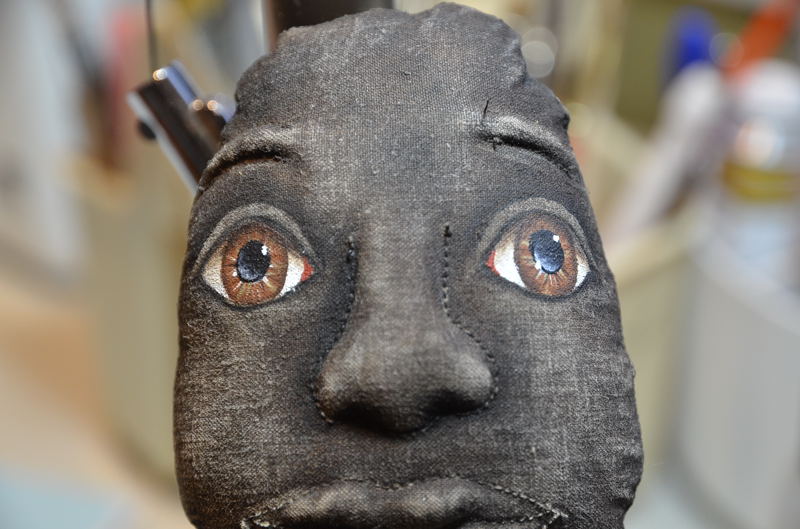
I know at this point she is looking a bit strange! Fill in the Iris with a brown such as autumn brown. 
Like spokes on a bike tire, use a liner brush and make lines in burnt umber, white and green starting from the inside and out toward the edges. All this fine detail work is done wearing an opti visor, this fits on your head and magnifies your work so you can see it close up!
Here I have loaded a small flat brush in burnt umber and added some shading around the outer edges of the eyes and directly under each eyelid. Adding the shadows under the eyelids is important, it takes that wide eyed stare away and looks more natural. 
I have added the black pupils, added a float of black (lightly) under the eyelids. I did not think they were dark enough. I also added a float of straight black above the eyes to define eyelids. I painted the inside corners of each eye with red iron oxide. I added a float of black around the nose to make it pop a bit. Anywhere you want to make a feature pop, you can also take a liner brush and line it. I did this with the nose, mouth and eyes. I also added white highlights in each eye.
They do not show up too well on the black, but I did add some eyelashes. I made them more heavy than normal so they would show up. 
I have mixed heritage brick and red iron oxide for the blush. I have my medium scruffy brush ready to apply the cheek and mouth color. Dip a dry brush into the paint puddle and swirl most of the paint off onto a paper towel until most of it is gone. You can either apply the color to a dry cheek or put a light sheen of antiquing medium on first to help the color come off softly.
Here is Belle with a little color on her cheeks and lips. Her personality is emerging! I also added two coats of 3D Crystal lacquer to each eye and a single light coat to the lips. This adds some realistic shine!
She is ready for the rest of her body and some hair. 

Here she is all finished with all kinds of crazy cork screw hair. Isn't she a funny little thing? :-)

Thank You Jody for another fun and informative Tutorial!
You can find Jody here:

Tuesday, February 26, 2013

Tuesday Tutorial with Sweet Bear Creek Whims

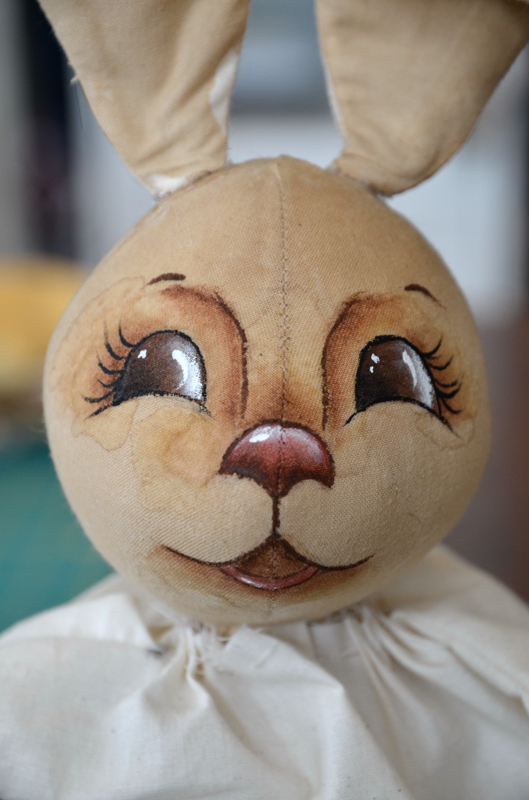
Face Painting Tutorial (Bunny)

Hello friends! I decided on a whim to take snap shots as I was painting my bunny today. This will show you how it progresses picture by picture. This is my next pattern in the works, so this is also a sneak peek of the head. I will be doing two different looking faces for this pattern. This bunny is Beatrice. Clover is bunny # 2 and I may do a tutorial on her face as well. 
Well here goes....
This particular head has only been stained with coffee, I will be painting on the straight muslin. Some heads I will go ahead and sponge on a base coat to start, in that case I omit the textile medium and use straight water. I have taken my mechanical pencil and lightly drawn in Beatrice's face. I start with the nose and position everything else from there.I get one of the eyes positioned correctly and draw it in. I then take my caliper tool and measure the width, height and distance from the nose. I take these measurements and make dots on the other side of the face. I then pencil in the lines connecting the dots for the other eye. I re check the measurements again and adjust if necessary.
I am using my caliper tool to check my measurements as I go. I have filled in my eyes in a dark chocolate brown.
Picture 3 is looking a little scary!! I have finished filling in the nose and lips in a nice combo of reds. I have taken a flat brush and my textile medium mix of 30% water to 70% textile medium, and dampened the areas to be shaded. The reason using this mix is important on fabric is because it keeps your paint from bleeding off where you don't want it to. A dampened area also makes your float strokes come off nicer and makes the paint move better. If I would have base coated this face first, it makes a canvas that will not have the bleeding issues, so water is fine in those cases.
Here is a foam plate with a puddle of my textile mix and brown all ready for shading around the Bunny's eyes, bridge of the nose and under the mouth area.
I used white here just so you can see it on the brush! I have dipped my clean brush in water, blotted off the excess on a paper towel. Do not remove all the water or the paint will not work into your brush nicely. I have dipped just the corner of the brush into my paint. I am now ready to go to my foam plate and work the paint into my brush for floating my shading and highlight colors on.
This is how the paint should look coming off your brush when it is loaded properly. It go from darker and fade off into nothing. To get this you work your brush back and forth pushing the paint into your brush. I flip the brush over and do it from the other side. If your paint is dragging, there is not enough water. If you have a soupy mess than there is too much. If it is too light, there was not enough paint added. There is a balance of enough water in your brush, enough paint, the right amount of working it in. Practice until you get it!! Clean your brush often in your brush basin during painting, never let the paint dry in your brush. I clean and side load over and over again during my painting. Sometimes I just dip in the paint puddle again and can do a quick work in and go again. I am now ready to shade in the dampened areas of my bunny.
I have applied some shading under the mouth, around outer eyes, bridge of nose, top of nose and lower edge of the nose.. I do my shading if various shades of browns. If you press hard, more paint comes off, if you have a lighter touch less will come off. With dark colors I am more conservative with how much I load into my brush and how hard I press. Sometimes I lightly walk the color out softly with a pitty pat motion and move the paint around. Do not over work your floats, they can end up looking bad. Just let it dry and float again over the same area. You can always add more but it is hard to take it away! It is hard to explain this step, practicing yourself is the most valuable thing to teach you there is. Tape a piece of muslin onto a foam plate and practice shading on scrap fabric before doing your finished piece. The face is looking a bit mottled here, that is okay, it is just the previous coffee staining moving around a bit from the textile mix. This doesn't show much in the end. My dolls are prim so I actually like the mottling.
Here I have floated some black in the left corners of the eyes and white on the right sides. I have also floated white highlights on the nose top and lips. I am way more generous with how much white I can load into my brush than browns. White takes more to show up. I usually end up re-applying white until I am happy with it.
I do want to stress that drying your layers is important to keep the paint from bleeding. I sometimes speed dry my painting with a heat gun. Here you see I have started my line work. Line work is done with a fine liner and paint watered down to an inky consistency. If I need more moisture as I am painting, I will dip my brush in my textile mix. A common mistake here is not loading your liner with enough paint. Load your brush heavy enough so the lines come off nicely. I have lined around the eyes in black as well as the eyelashes. I used my brown for line work on the bridge of the nose, nose, mouth and eye brows.
I am now ready to add my cheeks and muzzle. I use a DRY Donna Dewberry scruffy brush dipped in my cheek color. First though I dampened my cheek and muzzle area in my textile mix.
I then take my brush and swirl it around on my foam plate to saturate the bristles with paint. I love using the plates because they are non porous and leave the paint in the brush.
Next step is to swirl off most of the paint onto a dry paper towel until most of it is off the brush. There should only be a light amount of color coming off onto your paper towel. You are ready to add the cheeks by lightly swirling the color onto your dampened cheek area. You can also do this on a dry cheek (no medium). The result is a lighter cheek. The medium makes for a more intense color and much smoother. The choice is yours, I like both looks and do use them both.
This bunny is starting to come to life now! not so scary anymore. I have softly added cheeks. I added a touch on the forehead as well. Next I took some white and added a float of white on the muzzle area, the top of the nose, right side of the eyes, upper cheeks, under the eyes, bridge of nose and under the eyebrows. I made eye dots and highlight comma strokes on the lips, eyes and nose.
I added blush to her ears by coating them in textile mix and shading in my cheek color. I softened the area with a dry mop brush to finish. You may also just dry brush this on in the same technique as I explained for the cheeks.
Here she is all painted and ready for me to finish her body up! I think she is shaping up to be pretty cute. I am thinking that this fabric might be nice on her too. 

Thank you Jody for sharing this wonderful tutorial!
You can find Jody here:

Tuesday, November 6, 2012

Tuesday Tutorial with Jody of Sweet Bear Creek Whims

 Hello friends, in this post I will be showing you how I finished this little Ginger! I hope you enjoy taking a peek! First two pictures show this little ginger finished, scroll down to see him as he is being worked on.
This is also going to be one of my next patterns, there will be this little ginger and a snowman in the same pattern. Stay tuned!
Here he is in all his baked goodness, he does look like you could take a bite doesn't he? Okay, lets get started....
Here is my ginger sewn with muslin, stuffed and ready for painting.
You will need to have three colors... Honey Brown, Camel and Light Cinnamon. For this color meshing technique you will need a dampened sea sponge and a foam plate.
To get your sponge ready for applying color, you will need to dip your damp sea sponge up and down into your colors. I use less cinnamon, just dip a smaller area.
Before starting in on your actual piece, you will need to dab up and down onto your plate to mesh the paint into the sponge and get rid of any globs. When you are satisfied with how the color is coming off onto your plate, you are ready to apply this to your ginger. The mix of dark, med and light colors really looks neat!
Go to your ginger and pounce on the color. Keep dipping into your paint puddles as needed to resaturate your sponge. Don't forget to work it out on your foam plate first. You might want to wear rubber gloves, my hands got awful messy doing this.
Once I have one side done, I stop and speed dry it with my heat gun, be careful not to get it too close to your piece or it will burn! Turn your ginger over and paint the other side.
The sponge doesn't always get every spot, so I pounce more color with a scruffy brush in the bare spots. Let dry.
Now it's tme to draw on the face! I bet you thought I had some fancy method of doing this didn't you? Sometimes I even eye ball it, but this time I found the perfect sized button to trace around for the eyes. I start by finding the center with my caliper, put a pin in for reference and figure out from there where I want the first eye and draw around with a pencil. You can always erase if you don't do it neatly.
For the second eye, I measure the distance from the pin to the eye on the first one and get an idea where to place my second eye. From here I eyeball the mouth and eyebrows.
Here is his face all ready to be painted, he looks quite odd doesn't he? I also free handed the nose, I guess it looks kind of like a jelly bean.
I have filled in the eyes, mouth and eyebrown in black, the nose in a rusty color. I did more of a sideload for the nose, making the color stronger on the outer edge. I might add that because this ginger was completely basecoated first, there is no need to use a textile medium at all, just water in your brush.
With some cinnamon and burnt umber, I added some floated shadow around the eyes, lower lip and upper nose. To see more detailed instructions on floating color, linework etc... I have more painting tutorials here and more information on my website tips and hints page. He kind of looks like an alien here and not a ginger.
His little cheeks need some blush. Here you see Jo Sonja's retarder and antiqueing medium. I often times will do a light sheen of this on the cheeks before I apply color so it will come off soft and will be able to move. You can also just go on with your dry brush on a dry face and lightly swirl, it will look great too!
Here I have a medium sized Donna Dewberry scruffy brush, I left it dry for this application. I pounced into some of my color and swirled it around the plate a bit.
I rub most of the paint out into a dry paper towel until most of the paint is gone and only a bit comes off the brush. I now go to my cheeks and in a circular motion lightly apply the rosey cheeks.
He is looking more alive here, color on his cheeks, some sparkle added to his eyes with some white paint. His eyelashed were painted on with thinned down black and a fine liner brush.
He needs his yummy icing applied! I use a warm white and a long and fairly thick liner brush. I really load up the brush good so when I do my strokes the paint actually comes off crisply and you won't need to reload as often. If your paint is too thick, just thin down with some water. Put icing anywhere you like. I speed dry with a heat gun every now and then so I don't smudge.
Icing is finished, now I add three rusty bells down his front with a double strand of button thread. Since all his muslin was painted, he is nice and firm, fairly stiff like a real cookie.
Next I mix some water into some matte mod podge to thin it down a bit. I got this idea from my friend carol of Buttermilk Creek Farms! thanks Carol. She coated her ginger and sprinkled cinnamon and cloves, let it dry and coated the piece again in the mod podge. This makes it looked baked and very prim. For my little guy, I am going to do it a bit different. I will coat him in mod podge and then sprinkle a very fine glass glitter on him to represent sugar and give him some sparkle. He will also stiffen up even more with the mod podge. I did lightly sprinkle a bit of cinnamon here and there with the glass glitter, but I did not want to cover up my nice paint job so I did it really lightly.
I have him over a foam plate to help contain the mess. I don't know what I would do in my craft room without this handy dandy item. I also put my glass glitter into a glass spice jar so I could sprinkle properly. Any loose glitter is dumped back into the jar when I am done. Let this dry well, use the heat if you'd like. Tear a piece of homespun and tie a bow around your gingers neck.
I took my paint brush and painted on some fabric stiffener "stiffy" after I grunged up the fabric with some coffee and cinnamon. I liked the fabric to be fairly rigid since the ginger is as well.
Here he is again all finished! With the mottled paint, mod podge, cinnamon and glass sprinkles, he really does look like a ginger good enough to eat. How about adding a drop or two of a nice holiday fragrance oil to his bow, he will smell delicious then! Be looking for his pattern soon!
 
Thank you Jody for such a wonderful tutorial!
You can find Jody here: