


Let's make some Easter Eggs!!
Start with an Oval Pattern and make sure you have at least 1/4" extra for a seam allowance.

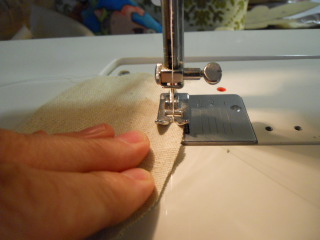
Sew them up all the way around. I always double stitch mine.
Cut a slit in the back.

Stuff them. I learned (after I'd done them all) that if you stuff them too much they will pucker on the sides. I just wanted some fat Easter Eggs!

Now let's put some color on them. If you want them bright, then just apply the paint with only a damp brush. IF, however, you want them a bit more Prim, then add a WASH to the fabric by adding water to your paints......OR you can wet your fabric and then brush on the paint. Your call.

Not perfect but I wasn't looking for perfection!

At this point, you can dip them in your PRIM/STAIN mix and bake/sun dry them. I chose to leave mine as is.

I hide the back stitching, which is quite hideous, by wrapping the ribbon all the way around with a spot or two of hot glue. Embellish as you desire.

Enjoy!
Thank You Vicky for sharing this wonderful tutorial.
Vicky can be found here:


.JPG)


2 comments:
Vicky makes it look so easy! Very Eastery. :)
Easy peasy... here comes Peter Cottontail! Thanks gals!
Carol
Post a Comment