


Face Painting Tutorial (Bunny)
Hello friends! I decided on a whim to take snap shots as I was painting my bunny today. This will show you how it progresses picture by picture. This is my next pattern in the works, so this is also a sneak peek of the head. I will be doing two different looking faces for this pattern. This bunny is Beatrice. Clover is bunny # 2 and I may do a tutorial on her face as well.
Well here goes....

This particular head has only been stained with coffee, I will be painting on the straight muslin. Some heads I will go ahead and sponge on a base coat to start, in that case I omit the textile medium and use straight water. I have taken my mechanical pencil and lightly drawn in Beatrice's face. I start with the nose and position everything else from there.I get one of the eyes positioned correctly and draw it in. I then take my caliper tool and measure the width, height and distance from the nose. I take these measurements and make dots on the other side of the face. I then pencil in the lines connecting the dots for the other eye. I re check the measurements again and adjust if necessary.

I am using my caliper tool to check my measurements as I go. I have filled in my eyes in a dark chocolate brown.

Picture 3 is looking a little scary!! I have finished filling in the nose and lips in a nice combo of reds. I have taken a flat brush and my textile medium mix of 30% water to 70% textile medium, and dampened the areas to be shaded. The reason using this mix is important on fabric is because it keeps your paint from bleeding off where you don't want it to. A dampened area also makes your float strokes come off nicer and makes the paint move better. If I would have base coated this face first, it makes a canvas that will not have the bleeding issues, so water is fine in those cases.

Here is a foam plate with a puddle of my textile mix and brown all ready for shading around the Bunny's eyes, bridge of the nose and under the mouth area.

I used white here just so you can see it on the brush! I have dipped my clean brush in water, blotted off the excess on a paper towel. Do not remove all the water or the paint will not work into your brush nicely. I have dipped just the corner of the brush into my paint. I am now ready to go to my foam plate and work the paint into my brush for floating my shading and highlight colors on.

This is how the paint should look coming off your brush when it is loaded properly. It go from darker and fade off into nothing. To get this you work your brush back and forth pushing the paint into your brush. I flip the brush over and do it from the other side. If your paint is dragging, there is not enough water. If you have a soupy mess than there is too much. If it is too light, there was not enough paint added. There is a balance of enough water in your brush, enough paint, the right amount of working it in. Practice until you get it!! Clean your brush often in your brush basin during painting, never let the paint dry in your brush. I clean and side load over and over again during my painting. Sometimes I just dip in the paint puddle again and can do a quick work in and go again. I am now ready to shade in the dampened areas of my bunny.

I have applied some shading under the mouth, around outer eyes, bridge of nose, top of nose and lower edge of the nose.. I do my shading if various shades of browns. If you press hard, more paint comes off, if you have a lighter touch less will come off. With dark colors I am more conservative with how much I load into my brush and how hard I press. Sometimes I lightly walk the color out softly with a pitty pat motion and move the paint around. Do not over work your floats, they can end up looking bad. Just let it dry and float again over the same area. You can always add more but it is hard to take it away! It is hard to explain this step, practicing yourself is the most valuable thing to teach you there is. Tape a piece of muslin onto a foam plate and practice shading on scrap fabric before doing your finished piece. The face is looking a bit mottled here, that is okay, it is just the previous coffee staining moving around a bit from the textile mix. This doesn't show much in the end. My dolls are prim so I actually like the mottling.

Here I have floated some black in the left corners of the eyes and white on the right sides. I have also floated white highlights on the nose top and lips. I am way more generous with how much white I can load into my brush than browns. White takes more to show up. I usually end up re-applying white until I am happy with it.
I do want to stress that drying your layers is important to keep the paint from bleeding. I sometimes speed dry my painting with a heat gun. Here you see I have started my line work. Line work is done with a fine liner and paint watered down to an inky consistency. If I need more moisture as I am painting, I will dip my brush in my textile mix. A common mistake here is not loading your liner with enough paint. Load your brush heavy enough so the lines come off nicely. I have lined around the eyes in black as well as the eyelashes. I used my brown for line work on the bridge of the nose, nose, mouth and eye brows.

I am now ready to add my cheeks and muzzle. I use a DRY Donna Dewberry scruffy brush dipped in my cheek color. First though I dampened my cheek and muzzle area in my textile mix.

I then take my brush and swirl it around on my foam plate to saturate the bristles with paint. I love using the plates because they are non porous and leave the paint in the brush.

Next step is to swirl off most of the paint onto a dry paper towel until most of it is off the brush. There should only be a light amount of color coming off onto your paper towel. You are ready to add the cheeks by lightly swirling the color onto your dampened cheek area. You can also do this on a dry cheek (no medium). The result is a lighter cheek. The medium makes for a more intense color and much smoother. The choice is yours, I like both looks and do use them both.

This bunny is starting to come to life now! not so scary anymore. I have softly added cheeks. I added a touch on the forehead as well. Next I took some white and added a float of white on the muzzle area, the top of the nose, right side of the eyes, upper cheeks, under the eyes, bridge of nose and under the eyebrows. I made eye dots and highlight comma strokes on the lips, eyes and nose.

I added blush to her ears by coating them in textile mix and shading in my cheek color. I softened the area with a dry mop brush to finish. You may also just dry brush this on in the same technique as I explained for the cheeks.

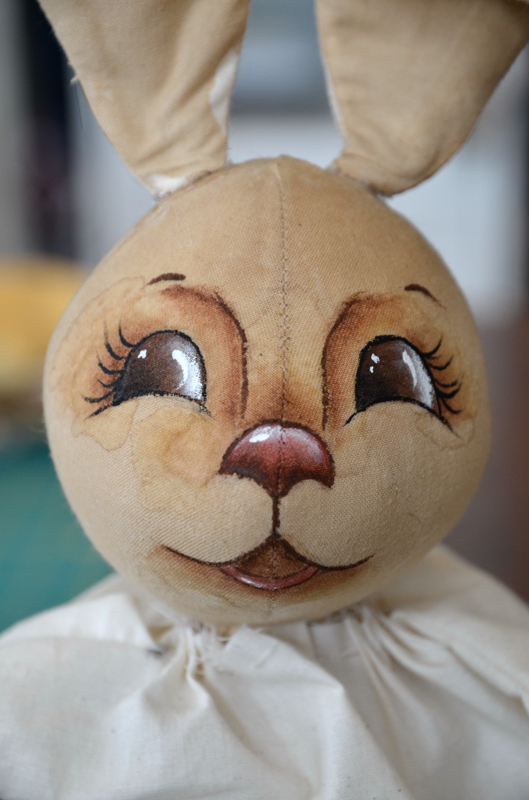
Here she is all painted and ready for me to finish her body up! I think she is shaping up to be pretty cute. I am thinking that this fabric might be nice on her too.
Thank you Jody for sharing this wonderful tutorial!
You can find Jody here:


.JPG)


5 comments:
This is amazing. Somehow I don't think I could do that painting near as nice as she does. Thanks for sharing with us. :)
love it! but even looking at it I don't think I could do it lol
Helen
This is so beautiful!!! Thanks so much for sharing your tutorial. I will have to get brave one day and try this. The pictures are fantastic and will be really helpful!
Lucy
Simply amazing! You put a lot of work into that cute bunny. Thanks for sharing!! Laura R.
Simply amazing! Thanks for sharing! Laura
Post a Comment