


First I want to say that for anyone wanting to learn Cold Process Soap Making, there is no better learning site than http://www.millersoap.com/ This site is the most informative, accurate and helpful I have ever found. She covers everything about the process. I will also give out some of my other recources as I post.
You generally cannot make bar soap at home without lye. Lye is not your enemy... it's a fallacy to think you can make soap without it (or some other caustic base substance to turn the fat molecules into soap compounds). Correctly made and cured homemade soap is milder than anything you can buy... even those fancy clear glycerin bars. Don't let the lye thing put you off. I think some of the marketers our there who claim their soap has no lye have confused the public. They are being misleading when stating that. It just means they didn't use lye in their portion of the manufacture... but in the beginning, it was used to saponify the fats. Notice on the soap labels that word, "saponify" ... or "sodium tallowate"... "sodium cocoate", etc.? That means tallow or coconut oil that have been made into soap with the use of sodium hydroxide (lye)... that's the sodium part.
I hope you give another look to make soap at home. It's wonderful stuff!
Okay, now that we have that out of the way, I want to add that once the Lye has done it's job, exhausted itself out and the curing process done... there is no lye left in the soap bars. What we have is wonderful, mild soap and not a speck of lye left. NOTE: Keep Lye away from pets and children. I have the benefit of doing my soap in our little cabin on our property, so I can focus. Locking pets up and keeping children in the other room is a good idea when working with LYE. Never inhale lye fumes.

Here is a sampling of some of the soaping ingredients I use. My recipe has wondeful ingredients like Olive Oil, Avocado Oil, Cocoa Butter, Castor Oil, Coconut Oil, Palm Kernel, Lard, Tussah Silk and cosmetic grade fragrance oils and essential oils. This is more of a luxury bar, but for learning there are many nice recipes that are fewer and simpler ingredients. I use the lye calculator found here: http://www.thesage.com/calcs/lyecalc2.php
This is the place to punch in your ingredients, it then tells you the proper amount of water, lye and other information for the size batch you are making. Just print your recipe out and you are good to go.
I have many resources, but one of the main ones I use for ingredients is http://www.soaperschoice.com/cgi-soaperschoice/Web_store/web_store.cgi?query_price_low_range=0&cart_id= A good bar of soap depends on what percentage of these oils that are used. A little research on what makes a good recipe is a good idea. For instance.... too much coconut is drying to the skin, so I do not use more that 20% in my recipes.
Here is a wonderful resource that tells you what each oil is good for and it's properties, it is very helpful to know this information. http://www.naturesgardencandles.com/mas_assets/pdf/soapoils.pdf

The first thing I do is get out my scale, it is important to have a very accurate scale that measures fractions of an ounce. The lye needs to be weighed out in one container and the water to mix it in in another. When buying LYE, make sure that it says 100% lye on the bottle and not a mix of some sort.

It is important to wear rubber gloves and wear eye protection when working with lye. Wearing a long sleeve shirt is also a good idea. Having a healthy respect for working around lye is essential. I take my water and lye outside and slowly mix the lye crystals into the water and stir for quite awhile until I am certain the lye is dissolved. The lye will be super heating the water. I put my my mixed lye in the freezer to help bring it down to a cooler temp.

After rinsing out the container the lye was in, I am ready to weigh out my hard fats in my stainless steel pan. The hard fats are Cocoa Butter, Coconut, Palm Kernel and lard. I put the container on the burner to a med low temp until melted.

Tee Hee, look at that mini stove, cute huh? I am glad I do not have to cook on something this tiny in my house!

While the hard fats are melting, I measure out all my other oils. I will add this to my melted oils. The nice thing this does is help to cool down the hot oils so it will be ready to soap fairly quickly.

I have my pot of oils and my lye all ready to go. The thermometer tells me when the temps hit 100 - 115, this is a good range to soap in. Once I have my temps, I put on my goggles, gloves and get ready to pour my lye into the pot of oils. I also have my scent all measured and ready to go as well as any colorants premixed. You can hand stir your batch, but I love using a stick blender. The blender works great and speeds up the soaping process.

Once the lye is in the pot time is of the essence, once this batch reaches trace it will be time to add my scent, colorant and get it into the mold before it sets up on me completely. As I stick blend, it emulsifies and becomes thicker. To figure out if the soap is at a light trace, lift your blender out of the soap... if it doesn't sink right in and leaves a trail before sinking in, it is ready to go. I like mine to be at a very light trace so I can have time to add scent and colorant.
I remove about 2 1/2 cups of soap to my container that has colorant and mix this up. My batch is about a 5 lb. batch so this is about right. I then pour the color back in the pot in 4 different spots, swirl a couple times with a spatula in the pot. As I pour it swirls itself from the pouring action.

Here is my mold, it is wood with a silicone insert. Molds can be made out of many things however and can be lined with butcher paper if you do not have a silicone liner.

I used blue mica powder for my swirls. Here is the soap right after it is poured into my mold. This soap was scented in blueberry. After the soap is poured, I put my wood lid on top and insulate the mold with towels. Insulating your molds helps to get the gelling process going. The lye super heats the soap for hours after it is poured, this process makes the final bar nice and translucent. Like I said earlier, once the lye exhausts itself out, there will be no trace of it in the final bars.

Here is the insulated mold. I leave this without touching it for an entire day... this is hard as I have no patience!!

Like I said.... I have no patience. I unmolded this soap a bit before I should have, because it is soft on the ends it made the ends yucky. Oh well, the end pieces will be my soap.

Here you see my soap cutter. The wire that cuts it is a guitar wire that is tightened on the ends. I make the width what I want it to be and cut the bars out. Cutting your soap by hand is just fine too!

The final result came out marbled and so much fun! They smell good enough to eat.
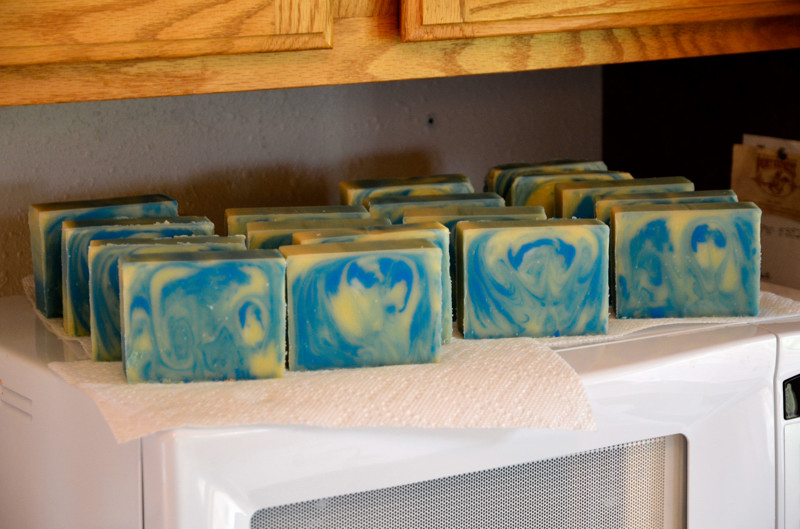
My mold makes 17 fairly large bars of soap. Cold Process soap needs to sit out and cure for up to 6 weeks. During this time, the soap like fine wine will mellow out, become mild, harden up and do it's thing. Once done the bars will shrink a little bit from the moisture going out. CP soap like to breathe so it is best to store your soap with some air. This is truly some of the best stuff you'll ever use! It is fun and anyone can learn to do it! You can wrap or decorate your soaps anyway you'd like, they make wonderful gifts too. I like to bevel the edges of my soap with a carrot peeler. The older soap gets the better it gets. The bars that you forget about having for a year or so are the best treat ever!

Here is a Citrus batch I did today, I will post the pictures of this batch tomorrow after I cut it. I hope I have inspired some of you to look into soap making!
NOTE: I also want to say that all equipment needs to be wiped out with paper towels before washing with hot soap and water. Getting all the goo out before hand is much better than washing it down your drain. If it sets up in your drain, you will have problems!!
Thank you Jody for sharing this tutorial with us!
Please visit Jody here:
http://www.etsy.com/shop/SweetBearCreekWhims
http://sweetbearcreekwhims.blogspot.com/
http://www.etsy.com/shop/SweetBearCreekWhims
http://sweetbearcreekwhims.blogspot.com/


.JPG)


7 comments:
Awesome tutorial, Jody. Very nicely done-it does make me want to start making soap as I love to try new things!
Thanks for sharing,
Deb
So interesting ! Have always wanted to try my hand at soap making. Also, thank you for clearing up the myths on lye :)
Susan
KeepSakeKorner
Thanks so much! if anyone has any questions beyond this, please give me an email...:-) sweetbearcreekwhims@hotmail.com
Hugs
Jody
Hi Jody,
I have a new appreciation for handmade soap, I never knew there was so much to it! Thanks for the info.
xoxo
What a great tutorial! Very interesting to learn more about the process. I think I'll just buy it!!
Vicky
Wonderful tutorial- thanks!
What a fantastic tutorial!!! Love the idea of the silicone insert for the wooden mold. Thanks for sharing Jody! Your pics make it so helpful too!!!
Post a Comment